Hii Techies!! I am going to write some important questions for iPhone. while i have read Apple docs, some books and developing apps and so far got this useful information and sharing with you.
I hope its helpful for you. but still if you have any precious suggestion just let me know i'll try to update this page every-time. I hope some of this knowledge helps you land your dream job!
So lets start from scratch..
All About iPhone App Development Concepts in Objective C Pgmg!!! Class Clusters
Class clusters are a design pattern that the Foundation framework makes extensive use of. Class clusters group a number of private concrete subclasses under a public abstract superclass. The grouping of classes in this way simplifies the publicly visible architecture of an object-oriented framework without reducing its functional richness. Class clusters are based on the Abstract Factory design pattern.
Without Class Clusters: Simple Concept but Complex Interface
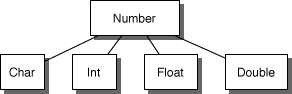
To illustrate the class cluster architecture and its benefits, consider the problem of constructing a class hierarchy that defines objects to store numbers of different types (char, int, float, double). Because numbers of different types have many features in common (they can be converted from one type to another and can be represented as strings, for example), they could be represented by a single class. However, their storage requirements differ, so it’s inefficient to represent them all by the same class. Taking this fact into consideration, one could design the class architecture depicted in Figure 1-1 to solve the problem.
Figure 1-1 A simple hierarchy for number classes
Number is the abstract superclass that declares in its methods the operations common to its subclasses. However, it doesn’t declare an instance variable to store a number. The subclasses declare such instance variables and share in the programmatic interface declared by Number.
So far, this design is relatively simple. However, if the commonly used modifications of these basic C types are taken into account, the class hierarchy diagram looks more like Figure 1-2.
Figure 1-2 A more complete number class hierarchy
The simple concept—creating a class to hold number values—can easily burgeon to over a dozen classes. The class cluster architecture presents a design that reflects the simplicity of the concept.
With Class Clusters: Simple Concept and Simple Interface
Applying the class cluster design pattern to this problem yields the class hierarchy in Figure 1-3 (private classes are in gray).
Figure 1-3 Class cluster architecture applied to number classes
Users of this hierarchy see only one public class, Number, so how is it possible to allocate instances of the proper subclass? The answer is in the way the abstract superclass handles instantiation.
Creating Instances
The abstract superclass in a class cluster must declare methods for creating instances of its private subclasses. It’s the superclass’s responsibility to dispense an object of the proper subclass based on the creation method that you invoke—you don’t, and can’t, choose the class of the instance.
In the Foundation framework, you generally create an object by invoking a +className... method or the alloc... and init... methods. Taking the Foundation framework’s NSNumber class as an example, you could send these messages to create number objects:
You are not responsible for releasing the objects returned from factory methods. Many classes also provide the standard alloc... and init... methods to create objects that require you to manage their deallocation.
Each object returned—aChar, anInt, aFloat, and aDouble—may belong to a different private subclass (and in fact does). Although each object’s class membership is hidden, its interface is public, being the interface declared by the abstract superclass, NSNumber. Although it is not precisely correct, it’s convenient to consider the aChar, anInt, aFloat, and aDouble objects to be instances of theNSNumber class, because they’re created by NSNumber class methods and accessed through instance methods declared by NSNumber.
Class Clusters with Multiple Public Superclasses
In the example above, one abstract public class declares the interface for multiple private subclasses. This is a class cluster in the purest sense. It’s also possible, and often desirable, to have two (or possibly more) abstract public classes that declare the interface for the cluster. This is evident in the Foundation framework, which includes the clusters listed in Table 1-1.
Table 1-1 Class clusters and their public superclasses
Other clusters of this type also exist, but these clearly illustrate how two abstract nodes cooperate in declaring the programmatic interface to a class cluster. In each of these clusters, one public node declares methods that all cluster objects can respond to, and the other node declares methods that are only appropriate for cluster objects that allow their contents to be modified.
This factoring of the cluster’s interface helps make an object-oriented framework’s programmatic interface more expressive. For example, imagine an object representing a book that declares this method:
-(NSString *)title;
The book object could return its own instance variable or create a new string object and return that—it doesn’t matter. It’s clear from this declaration that the returned string can’t be modified. Any attempt to modify the returned object will elicit a compiler warning.
1. what are Mac OSX Versons?
Cheetah
Puma
Jaguar
Panther
Tiger
leopard
snowleopard
lion
Mountain Lion
Mavericks
El'Caption
2.Objective C ? Objective C is based on C Pgmg L'ge,With lots of Object Oriented Pgmg was added to It.It was orginally developed in 1980's by Brad Coax , Tim love. Objective -C is used to write Software for Mac OSX and IOS .It is based on Small Talk Style Example : In C++ , obj -->do(arg); In Objective-C , [obj doWithArg:arg]; Compile Time : The source Code must be compiled into Machine Code in order to become Executable Pgm. RunTime: A compiled pgm can be Opened and run by user.When application is running,it is called RunTime. Is Objective-C Dynamic language?? Yes!! Whenever possible, it does things dynamically. This means that language requires not just a compiler , but also runtime system to execute the CompiledCode. The runtime system acts as a kind of operation system for obj-c language.It's what makes the language work's.
3.what are delegate and data source methods in UITABLEVIEW ? UITableView is a ameans for Displayng and Editing hierarchial list of Information A tableView displays a list of Items in a singleColoumn UITableView is SubClass of UIScrollView vch allows users to scroll thru the table although UITableView allow's Vertical Scrolling ONLY!!
DataSource Methods: Provides information that uitableview needs to construct tables and manages the data models when rows of a atable are inserted , deleted or re-ordered The UITableView, the actual class behind the Table View, is designed to be flexible to handle various types of data. You may display a list of countries or contact names. Or like this example, we’ll use the table view to present a list of recipes. So how do you tell UITableView the list of data to display? UITableViewDataSource is the answer. It’s the link between your data and the table view. The UITableViewDataSource protocol declares two required methods (tableView:cellForRowAtIndexPath and tableView:numberOfRowsInSection) that you have to implement. Through implementing these methods, you tell Table View how many rows to display and the data in each row.
Required Methods in UITableView
-(NSInteger)tableView:(UITableView*)tableView numberOfRowsInSection:(NSInteger)section {return[catagorry count];//count number of row from counting array }
Manages table row configuration and selection row reordering highlightng acessoryview and editing opertaions.
UITableViewDelegate, on the other hand, deals with the appearance of the UITableView. Optional methods of the protocols let you manage the height of a table row, configure section headings and footers, re-order table cells, etc. We do not change any of these methods in this example. Let’s leave them for the next tutorial.
How To navigate if we selected a particular cell in TableView -(void)tableview:(UITableView *)tableview didSelectRowAtIndexPath: (NSIndexPath *)indexpath { secondViewCocntroler*sc=[secondViewControler alloc]initwithnibname:@"Second" bundle:nil]; // second(in nib name is cell id in second controle class) [self.navigationcontroller pushviewcontroller: sc animated:YES]; } How To Create Custom Cell in UITableView
4.what z da difference b/w datasource and delegate methods in UITableview? The UITableViewDataSource delegate, that we’ve implemented, defines methods that are used for displaying table data. On the other hand, the UITableViewDelegate deals with the appearance of the UITableView, as well as, handles the row selection. 5.Difference b/w willSelectRowAtIndexPath: didSelectRowAtIndexPath ?
Both of the methods are used for row selection. The only difference is that “willSelectRowAtIndexPath” is called when a specified row is about to be selected. Usually you make use of this method to prevent selection of a particular cell from taking place.
Typically, you use “didSelectRowAtIndexPath” method, which is invoked after user selects a row, to handle the row selection and this is where you add code to specify the action when the row is selected. In this tutorial, we’ll add a couple of actions to handle row selection
The first line retrieves the selected table cell by using the indexPath. The second link updates the accessory view of the cell with a check mark.Compile and run the app. After you tap a row, it’ll show you a check mark.
For now, when you select a row, that row will be highlighted in blue color. If you don’t like it, try to add the following code to deselect the row.
9.How to Quit or exit app Progrmatically? exit(0);
10 What is Delegate in Objective C?
Delegate is an object that is delegated control of user interface for that event (or) interpret the event in an application specific manner.
Delegate is responsible for dealing with user interactions, or customizing the display of certain entries.
Delegate uses protocol and creates a relationship between the two classes.
10.What is PList? Property list offers a convenient way to store simple structural data. It usually appears in XML format.
You can’t use property list to save all types of data. The items of data in a property list are of a limited number of types including “array”, “dictionary”, “string”, etc.
The items of data in a property list are of a limited number of types. Some types are for primitive values and others are for containers of values.
The primitive types are strings, numbers, binary data, dates, and Boolean values. The containers are arrays—indexed collections of values—and dictionaries—collections of values each identified by a key. The containers can contain other containers as well as the primitive types. Thus you might have an array of dictionaries, and each dictionary might contain other arrays and dictionaries, as well as the primitive types.
A root property-list object is at the top of this hierarchy, and in almost all cases is a dictionary or an array. Note, however, that a root property-list object does not have to be a dictionary or array; for example, you could have a single string, number, or date, and that primitive value by itself can constitute a property list.
After Creating Plist file [ By selecting project select “New File…”. Select “Other” under “iOS” template, choose “Property List” and click “Next” to continue. ]
Write these statements
//Find Out Path for Plist file(the one vch u hav created)
11.When to use property list? Many applications require a mechanism for storing information that will be needed at a later time. For situations where you need to store small amounts of persistent data—say less than a few hundred kilobytes—property lists offer a uniform and convenient means of organizing, storing, and accessing the data. 12.What is Splash Screen?
Splash screen is commonly found in iOS apps, as well as, other desktop applications. This is the first screen you see when launching an application. Usually, splash screen is an image covering the entire screen and disappears after the main screen is loaded. Below figure shows you a few samples of splash screen:
The primary purpose of splash screen is to let user know your app is loading and give user an introductory screen showing your brand. Splash screen is especially important for apps that take longer time to launch. Perceptually, it gives a better user experience.
Adding Splash Screen in Your App
As mentioned earlier, it’s not required to write any code to display the splash screen. iOS comes with a built-in function called launch image. This image is automatically displayed when user opens the app and disappeared until the app is fully ready to use. You can simply specify your splash screen as launch image in Xcode and it will handle the rest for you.
12.Model View Controller?
Model – model is responsible for holding the data or any operations on the data. The model can be as simple as an array object that stores all the table data. Add, edit and delete are examples of the operations. In reality, the operations are usually known as business rules.
View – view manages the visual display of information. For example, UITableView shows information in a table view format.
Controller – controller is the bridge between model and view. It translates the user interaction from the view (e.g. tap) into appropriate action to be performed in the model. For example, user taps a delete button in the view and controller, in turn, triggers a delete operation in the model. After that, it also requests the view to refresh itself to reflect the update of the data model.
To better help you understand MVC, let’s use our Simple Table app as an example. The app displays a list of recipes in the table view. If you turn the concept into visual representation, here is how the table data is displayed: The recipe information that are stored in separate array objects is the Model. Each table row maps to an element of the recipe arrays. The UITableView object is the View that is the interface to be seen by the user. It’s responsible for all the visuals (e.g. color of the table rows, font size and type). The TableViewController acts as the bridge between the TableView and Recipe data model. When display table data, UITableView actually asks the Controller for the data to display, that in turn, picks the data from the model.
14.How To Delete a Row from UITableView?
There are three main things we need to do:
1. Write code to switch to edit mode for row deletion 2. Delete the corresponding table data from the model 3. Reload the table view in order to reflect the change of table data
1. Write code to switch to edit mode for row deletion
In iOS app, user normally swipes across a row to initiate the delete button. Recalled that we have adopted the UITableViewDataSource protocol, if you refer to the API doc, there is a method namedtableView:commitEditingStyle:forRowAtIndexPath. When user swipes across a row, the table view will check to see if the method has been implemented. If the method is found, the table view will automatically show the “Delete” button.
Simply add the following code to your table view app and run your app:
Even the method is empty and doesn’t perform anything, you’ll see the “Delete” button when you swipe across a row.
2. Delete the corresponding table data from the model
The next thing is to add code to the method and remove the actual table data. Like other table view methods, it passes the indexPath as parameter that tells you the row number for the deletion. So you can make use of this information and remove the corresponding element from the data array.
In the original code of Simple Table App, we use NSArray to store the table data (which is the model). The problem of NSArray is it’s non-editable. That is, you can’t add/remove its content once the array is initialized. Alternatively, we’ll change the NSArray to NSMutableArray, which adds insertion and deletion operations:
-(void)viewDidLoad { [super viewDidLoad]; // Initialize table data tableData =[NSMutableArray arrayWithObjects:@"Egg Benedict", @"Mushroom Risotto", @"Full Breakfast", @"Hamburger", @"Ham and Egg Sandwich", @"Creme Brelee", @"White Chocolate Donut", @"Starbucks Coffee", @"Vegetable Curry", @"Instant Noodle with Egg", @"Noodle with BBQ Pork", @"Japanese Noodle with Pork", @"Green Tea", @"Thai Shrimp Cake", @"Angry Birds Cake", @"Ham and Cheese Panini", nil]; }
In the tableView:commitEditingStyle method, add the following code to remove the actual data from the array. Your method should look like this:
In the tableView:commitEditingStyle method, add the following code to remove the actual data from the array. Your method should look like this:
1
2
3
4
5
-(void)tableView:(UITableView *)tableView commitEditingStyle:(UITableViewCellEditingStyle)editingStyle forRowAtIndexPath:(NSIndexPath*)indexPath { // Remove the row from data model [tableData removeObjectAtIndex:indexPath.row]; }
The NSMutableArray provides a number of operations for you to manipulate the content of an array. Here we utilize the “removeObjectAtIndex” method to remove a particular item from the array. You can try to run the app and delete a row. Oops! The app doesn’t work as expected.
It’s not a bug. The app does delete the item from the array. The reason why the deleted item still appears is the view hasn’t been refreshed to reflect the update of the data model.
3. Reload the table view
Therefore, once the underlying data is removed, we need to invoke “reloadData” method to request the table View to refresh. Here is the updated code:
1
2
3
4
5
6
7
8
-(void)tableView:(UITableView *)tableView commitEditingStyle:(UITableViewCellEditingStyle)editingStyle forRowAtIndexPath:(NSIndexPath*)indexPath { // Remove the row from data model [tableData removeObjectAtIndex:indexPath.row];
// Request table view to reload [tableView reloadData]; }
15.How to store user info using Sqlite ?
It’s lightweight.
It contains an embedded SQL engine, so almost all of your SQL knowledge can be applied.
It works as part of the app itself, and it doesn’t require extra active services.
It’s very reliable.
It’s fast.
It’s fully supported by Apple, as it’s used in both iOS and Mac OS.
It has continuous support by developers in the whole world and new features are always added to it.
16.What is the MVC software architecture pattern?
What Most People Say: MVC is the pattern all well-written applications use.
What You Should Say: The Model-View-Controller pattern separates the internal representation of data from its display. The model is the internal representation of the data, while the view is how the data is presented to the user. The controller mediates between the two and also handles user interaction.
Why You Should Say It: “Candidates sound evasive when they don’t explain what MVC is or how it’s used,” says Schweitzer. “An incomplete answer makes it seem like you don’t understand the purpose of MVC software architecture patterns.”
17.What is a delegate?
What Most People Say: Delegates are used in UITableView to get the data for the table.
What You Should Say: Delegates are Apple’s way of implementing call back methods. They allow a class to send information to a different class.
Why You Should Say It: “Again, a short answer doesn’t inspire confidence,” Schweitzer explains. “You need to show that you understand the purpose of delegates and how they fit into the architecture of the application without pontificating. The key is to supply just enough information to demonstrate your understanding of a concept or function, then get off the stage.”
18.What is the difference between a delegate and an NSNotification?
What Most People Say: They are different ways of accomplishing the same thing. They are completely different and are used in different ways.
What You Should Say: Delegates and NSNotifications can be used to accomplish nearly the same functionality. However, delegates are one-to-one while NSNotifications are one-to-many.
Why You Should Say It: Developers who don’t know the answer to a technical question often resort to double speak, which never works. Instead, demonstrate your experience with delegates and NSNotifications by explaining how they’re used and the advantages and disadvantages of each.
19.What is a block and how is it used?
What Most People Say: A block is a function.
What You Should Say: A block is a chunk of code that can be passed to a method. The code is executed based on what happens in the method. Apple is moving many of the iOS APIs toward blocks.
Why You Should Say It: Firstand foremost, “a block is not a function,” observes Schweitzer. “The second answer is not only accurate, it shows that you’re following the trends, which is critical for a developer.”
20.What’s the difference between a xib and a storyboard?
What Most People Say: They’re the same thing.
What You Should Say: Both are used in Xcode to layout screens (view controllers). A xib defines a single view controller screen, while a storyboard shows many view controllers and also shows the relationship between them. Apple is encouraging developers to use storyboards for all their applications.
Why You Should Say It: “The interviewer isn’t trying to trick you,” says Schweitzer. “Storyboards and xib files are similar but they’re not exactly the same. He wants you to differentiate the two and explain their advantages and disadvantages.”
21.What is CoreData?
What Most People Say: CoreData is Apple’s way of storing data on the disk.
What You Should Say: CoreData is an SQLite database API. By setting up CoreData properly, an application can store and retrieve the internal state of a class rapidly.
Why You Should Say It: Incorporating details into your answers demonstrates your understanding of the concept and inspires confidence.
22.Describe Waterfall and Agile methodologies.
What Most People Say: Waterfall is the older methodology that is not used in modern software development.
What You Should Say: Books have been written about this. Briefly, in Waterfall the requirements are defined without much or any interaction with the software development team. In Agile, there is continuous refining of requirements as development proceeds due to constant interaction between those defining the requirements and the people doing the development.
Why You Should Say It: Waterfall is older but it’s still used and the interviewer didn’t ask you to rate the two, Schweitzer says. You should explain the differences between the two methodologies, then invite an in-depth conversation by explaining when each is most effective and describing your experience with each one.
23.Difference between COCOA,COCOA touch and objective C.
Objective C is a dynamic programming language - a bit like C++ and a bit like Java.
Cocoa is the application framework for Mac OS X.
Cocoa Touch is the application framework for iPhone and iPod Touch - very similar to Cocoa.
Cocoa is commonly referred to as the combination of the Foundation and AppKit frameworks, while Cocoa Touch is the combination of the Foundation and UIKit frameworks.
Cocoa and Cocoa Touch sit on top of other collections of frameworks to create the API stacks. The other layers are Media, Core Services and Core OS.
The main difference between Cocoa and Cocoa touch is that the UI classes and APIs aren't the same as Mac OS X, so instead of NSTextField, you have UITextField. Many of the classes share the same functionality and can be ported quite easily by simply changing the class name, though most will require some more changes, but usually nothing too heavy.
There are also some differences between the Foundation frameworks in Cocoa and Cocoa Touch, most commonly missing classes, eg, Cocoa has NSHost and Cocoa Touch doesn't.
24.What is KVC (Key Value Coding)
The KVC is a concept to directly getting and setting specific properties of an object. In key value coding we have to pass a "Key" (any string) for getting and setting the property associated with that key. Its not necessary to use KVC, we can also complete our project without using it. However, it is one of the best code patterns for reducing repetitious code and making classes more reusable by decoupling actions from properties and data.
25. What is the significant of passing (NSDictionary *)launchOptions in application didFinishLaunchingWithOptions ? What are the options in application didFinishLaunchingWithOptions ? Launching an application by tapping its icon, an application can be launched in order to respond to a specific type of event.
For example, it could be launched in response to an incoming push notification, it could be asked to open a file, or it could be launched to handle some background event that it had requested. In all of these cases, the options dictionary passed to theapplication:didFinishLaunchingWithOptions: method provides information about the reason for the launch.
In situations where the application is already running, the methods of the application delegate are called in response to key changes.
When you actually receive a notification, there are 2 way it can be handel in our application: 1. When application is not running, and user click on view button on the notification. To interpret this notification we have to implementapplication:didFinishLaunchingWithOptions: instead of applicationDidFinishLaunching: like this:
2. And when application is already in running state, in this case application delegate receives a call to application:didReceiveRemoteNotification:. This method also receives userInfo like this: -(void)application:(UIApplication *)application didReceiveRemoteNotification:(NSDictionary*)userInfo
26.What is the way to store value as default in application without using nsuserdefault for the application run firts time, because first time there will be no any data in nsuserdefault.
Through Plist 27.Why SQLite?
SQLite does not require a separate server process or system to operate.(serverless).
SQLite comes with zero-configuration, which means no setup or administration needed.
A complete SQLite database is stored in a single cross-platform disk file.
SQLite is very small and light weight, less than 400KiB fully configured or less than 250KiB with optional features omitted.
SQLite is self-contained, which means no external dependencies.
SQLite transactions are fully ACID-compliant, allowing safe access from multiple processes or threads.
SQLite supports most of the query language features found in the SQL92 (SQL2) standard.
SQLite is written in ANSI-C and provides simple and easy-to-use API.
SQLite is available on UNIX (Linux, Mac OS-X, Android, iOS) and Windows (Win32, WinCE, WinRT).
SQLite Commands:
The standard SQLite commands to interact with relational databases are similar as SQL. They are CREATE, SELECT, INSERT, UPDATE, DELETE and DROP. These commands can be classified into groups based on their operational nature:
DDL - Data Definition Language:
Command
Description
CREATE
Creates a new table, a view of a table, or other object in database
ALTER
Modifies an existing database object, such as a table.
DROP
Deletes an entire table, a view of a table or other object in the database.
DML - Data Manipulation Language:
Command
Description
INSERT
Creates a record
UPDATE
Modifies records
DELETE
Deletes records
DQL - Data Query Language:
Command
Description
SELECT
Retrieves certain records from one or more tables
Install SQLite On Mac OS X
Though latest version of Mac OS X comes pre-installed with SQLite but if you do not have installation available then just follow the following steps:
Go to SQLite download page, and download sqlite-autoconf-*.tar.gz from source code section.
Above procedure will end with SQLite installation on your Mac OS X machine which you can verify by issuing following command:
$sqlite3
SQLite version 3.7.15.22013-01-0911:53:05Enter".help"for instructions
Enter SQL statements terminated with a ";"
sqlite>
Finally, you have SQLite command prompt where you can issue SQLite commands to do your excercises.
SQLite is followed by unique set of rules and guidelines called Syntax. This tutorial gives you a quick start with SQLite by listing all the basic SQLite Syntax.
Case Sensitivity
Important point to be noted is that SQLite is case insensitive, but there are some commands, which are case sensitive like GLOB and glob have different meaning in SQLite statements.
Comments
SQLite comments are extra notes, which you can add in your SQLite code to increase its readability and they can appear anywhere; whitespace can occur, including inside expressions and in the middle of other SQL statements but they can not be nested.
SQL comments begin with two consecutive "-" characters (ASCII 0x2d) and extend up to and including the next newline character (ASCII 0x0a) or until the end of input, whichever comes first.
You can also use C-style comments, which begin with "/*" and extend up to and including the next "*/" character pair or until the end of input, whichever comes first. C-style comments can span multiple lines.
28.Core Data is not a Database
When we talk about persistent data, people probably think of database. If you are familiar with Oracle or MySQL, you know that relational database stores data in the form of table, row and column, and it usually facilitates access through what-so-called SQL query. However, don’t mix up Core Data with database. Though SQLite database is the default persistent store for Core Data on iPhone, Core Data is not a relational database. It is actually a framework that lets developers store (or retrieve) data in database in an object-oriented way
Core Data Stack
Before we start working on the project, you first have to understand the Core Data Stack:
Managed Object Model– It describes the schema that you use in the app. If you have a database background, think of this as the database schema. However, the schema is represented by a collection of objects (also known as entities). In Xcode, the Managed Object Model is defined in a file with the extension .xcdatamodeld. You can use the visual editor to define the entities and their attributes, as well as, relationships.
Persistent Store Coordinator – SQLite is the default persistent store in iOS. However, Core Data allows developers to setup multiple stores containing different entities. The Persistent Store Coordinator is the party responsible to manage different persistent object stores and save the objects to the stores. Forget about it you don’t understand what it is. You’ll not interact with Persistent Store Coordinator directly when using Core Data.
Managed Object Context – Think of it as a “scratch pad” containing objects that interacts with data in persistent store. Its job is to manage objects created and returned using Core Data. Among the components in the Core Data Stack, the Managed Object Context is the one you’ll work with for most of the time. In general, whenever you need to fetch and save objects in persistent store, the context is the first component you’ll talk to.
29.Describe Managed Object Context and Functionality??
A managed object context (represented by an instance of NSManagedObjectContext) is basically a temporary “scratch pad” in an application for a (presumably) related collection of objects. These objects collectively represent an internally consistent view of one or more persistent stores. A single managed object instance exists in one and only one context, but multiple copies of an object can exist in different contexts.
You can think of a managed object context as an intelligent scratch pad. When you fetch objects from a persistent store, you bring temporary copies onto the scratch pad where they form an object graph (or a collection of object graphs). You can then modify those objects however you like. Unless you actually save those changes, though, the persistent store remains unchanged.
Key functionality provided by a managed object context includes:
Life-cycle management. The context provides validation, inverse relationship handling, and undo/redo. Through a context you can retrieve or “fetch” objects from a persistent store, make changes to those objects, and then either discard the changes or commit them back to the persistent store. The context is responsible for watching for changes in its objects and maintains an undo manager so you can have finer-grained control over undo and redo. You can insert new objects and delete ones you have fetched, and commit these modifications to the persistent store.
Notifications. A context posts notifications at various points which can optionally be monitored elsewhere in your application.
Concurrency. Core Data uses thread (or serialized queue) confinement to protect managed objects and managed object contexts. In OS X v10.7 and later and iOS v5.0 and later, when you create a context you can specify the concurrency pattern with which you will use it using initWithConcurrencyType:.
30.compare and contrast different ways of acheving concurrent in osx and IOS ?
There are basically three ways of achieving concurrency in iOS:
threads
dispatch queues
operation queues
The disadvantage of threads is that they relegate the burden of creating a scalable solution to the developer. You have to decide how many threads to create and adjust that number dynamically as conditions change. Also, the application assumes most of the costs associated with creating and maintaining the threads it uses.
OS X and iOS therefore prefer to take an asynchronous design approach to solving the concurrency problem rather than relying on threads.
One of the technologies for starting tasks asynchronously is Grand Central Dispatch (GCD) that relegates thread management down to the system level. All the developer has to do is define the tasks to be executed and add them to the appropriate dispatch queue. GCD takes care of creating the needed threads and scheduling tasks to run on those threads.
All dispatch queues are first-in, first-out (FIFO) data structures, so tasks are always started in the same order that they are added.
An operation queue is the Cocoa equivalent of a concurrent dispatch queue and is implemented by the NSOperationQueue class. Unlike dispatch queues, operation queues are not limited to executing tasks in FIFO order and support the creation of complex execution-order graphs for your tasks.
When the above code dispatches work using NSOperationQueue’s method addOperationWithBlock, there is no guarantee that the block being enqueued will be executed on the main thread. Notice that the content of the UILabel is being updated within the body of the block. UI updates that are not executed on the main thread can lead to undefined behavior. This code might appear to be working correctly for a long time before anything goes wrong, but UI updates should always happen on the main thread.
The easiest way to fix the potential issue is to change the body of the block so that the update is re-enqueued using the main thread’s queue as follows:
32.Difference between atomic and nonatomic?when to use both? Properties specified as atomic are guaranteed to always return a fully initialized object. This also happens to be the default state for synthesized properties so, while it’s a good practice to specify atomic to remove the potential for confusion, if you leave it off, your properties will still be atomic. This guarantee of atomic properties comes at a cost to performance, however. If you have a property for which you know that retrieving an uninitialized value is not a risk (e.g. if all access to the property is already synchronized via other means), then setting it to nonatomic can gain you a bit of performance. 33.Coredata Keywords??
Core Data's focus is on objects rather than the traditional table-driven relational database approach. When storing data, you are actually storing an object's contents, where an object is represented by an Objective-C class that inherits the NSManagedObject class. A typical application will have several objects used together, forming an object graph. For our sample data set, a car object contains car type, details, and manufacturer objects as members. Your application modifies the objects directly; when saving the objects, theNSManagedObjectContext save method is called. Conversely, your application will fetch stored objects using the NSManagedObjectContext object. Core Data handles all the details of saving the changes.
Figure 2 shows the main components of Core Data.
DataModel in CoredataThe Data Model is where you define your data objects and their relations. This is done using the Data Model Editor, which is part of the XCode IDE. The data model file is stored locally (on your development system) as an XML file. However, when your application is built, this file is compiled in to a binary file (with a .momd extension) that is bundled with your iOS application. Each object is referred to as an "Entity," which contains one or more attributes. Don't get confused with the terminology here, an Entity is an object and an attribute is a member of your object. XCode will generate the source code (.m and .h files) for the classes defined in the Data Model Editor. To do so, select the data model and then the menu selection: Editor/Create NSManagedObject Subclass.
Figure 3 is a screen shot of the Data Model Editor in XCode
Foreign Key and relationshp Between Objects
An important design consideration for your objects is the relationships between them. By "relationship" I am referring to instances when one object contains a reference to another. Is this a reference to many (one-to-many)? Or a reference each way to many (many-to-many)? In the sample application, the Car object references a CarType object where the CarType object is also referenced by other Car object instances. This is a one-to-many relationship between the CarType and Car object — one CarType can reference many Car objects. This is similar in concept to a SQL foreign key and it is important to understand because any change to theCarType record will affect all of the Car objects. Figure 4 illustrates this relationship.
Persistance Store CoordinatorThe Persistent Store Coordinator (NSPersistentStoreCoordinator) handles the details of the actual physical storage, whether the storage is a SQLite database, binary file, or iCloud. Your application doesn't know or care, it just works with the application objects directly. The nice thing about using Core Data is the ability to use these different storage types seamlessly. The Persistent Store Coordinator can handle different store instances. You might want to store frequently changing price data (such as gas prices) using iCloud, and store static data locally (such as gas station location). How you model, store, and manage you data should be driven by your application's requirements. The Persistent Store Coordinator uses the compiled data model file to determine the structure and organization of the objects being stored.
NSManaged Object Context
The Managed Object Context (NSManagedObjectContext) works with the Persistent Store Coordinator to fetch, save, and track the collection of objects. These are powerful features, as the application does not have to track if one object in a collection has been modified or the details of storing the objects. The Managed Object Context also acts a scratch pad of sorts for your object collection. If your application makes changes to the objects and later needs to discard these changes, it's no problem — the application can use the Undo Manager (NSUndoManager) or simply reset the Managed Object Context (using the reset method) and discard references to any of the objects.
There can be more than one Managed Object Context instance for a single store. For example, an application might use different contexts for different fetch results. As a result, an object instance can exist in both contexts simultaneously, potentially causing data inconsistencies. Each managed object is assigned a unique ID when the object is saved (a temporary ID is assigned if the object has never been saved), and an application can use this ID to ensure data consistency when using multiple contexts. However, the application is then forced to track object changes, which doesn't make sense since that's the job of Core Data. In short, it's best to use multiple contexts if there is a compelling reason.
Figure 5 illustrates the concept of how the Managed Object Context manages the core data objects (NSManagedObject).
Figure 5.
One of the downsides of the Managed Object Context is that all of the objects are operated on together: It is not possible to save just one NSManagedObject instance because all are saved at once. If your application must work with a lot of NSManagedObjects at the same time, be careful about the amount of memory used. In the sample application, when creating 250,000Car records, 260 MB is used. To put this memory usage in context, the iPhone 5s has 1 GB of memory and the iPhone 4s has 512 MB of memory. On an iPhone 5s, if more than 350,000 records are created, the test application receives a memory warning (-(void)didReceiveMemoryWarning is called). Yes, 260 MB is a lot, but remember that the each of the 250,000 objects are in memory, fully realized — meaning all the Car member variables are also in memory. If you restart the sample application and fetch the 250,000 records you just created, you will notice the amount of memory used is 105 MB — much less than the 260 MB used to create the records — what happened? The answer comes courtesy of one of Core Data's powerful features: object faulting.
Object faulting is the ability of the Managed Object Context to load an object in memory when it is accessed. If the object is never accessed, the memory is never allocated, thus reducing memory usage. This happens behind the scenes: Your application runs along happily. In the attached sample application, when accessing the CarType from the Car object, if the CarTypeisn't in memory; Core Data will automatically load it in memory with the correct data for you. The NSManagedObject method isFault enables your application to determine if the object is truly in memory or loaded into memory when accessed.
Creating a managed object is a little different. Instead of the usual allocinit pattern to create a new object instance, an application should call the NSEntityDescription insertNewObjectForEntityForName method using the Managed Object Context as an input argument. The following code snippet shows how the sample code Car object is created:
Car *car = [NSEntityDescription insertNewObjectForEntityForName:@"Car"
inManagedObjectContext:_managedObjectContext];
NSEntityDescription insertNewObjectForEntitryForName is actually a convenience method. Underneath the hood, an NSManagedObject is created for the entity @Car and inserted into theNSManagedObjectContext. The important point here is to understand that the Managed Object Context knows about all of the objects.
34.How to hide keyboard when user clicks on uiview?? A. -(void) touchesBegan:(NSSet*)touches withEvent:(UIEvent*)event {
applicationWillTerminate: (Called only when the app is running. This method is not called if the app is suspended.)
The specific tasks you perform during a given state transition are dependent upon your app and its capabilities. For tips and guidance about what to do during state transitions, see App Programming Guide for iOS.
36.What are App's States??
A.
37.What are Threads and Concurrency in IOS??
Threads and Concurrency
The system creates your app’s main thread and you can create additional threads, as needed, to perform other tasks. For iOS apps, the preferred technique is to use Grand Central Dispatch (GCD), operation objects, and other asynchronous programming interfaces rather than creating and managing threads yourself. Technologies such as GCD let you define the work you want to do and the order you want to do it in, but let the system decide how best to execute that work on the available CPUs. Letting the system handle the thread management simplifies the code you must write, makes it easier to ensure the correctness of that code, and offers better overall performance.
When thinking about threads and concurrency, consider the following:
Work involving views, Core Animation, and many other UIKit classes usually must occur on the app’s main thread. There are some exceptions to this rule—for example, image-based manipulations can often occur on background threads—but when in doubt, assume that work needs to happen on the main thread.
Lengthy tasks (or potentially length tasks) should always be performed on a background thread. Any tasks involving network access, file access, or large amounts of data processing should all be performed asynchronously using GCD or operation objects.
At launch time, move tasks off the main thread whenever possible. At launch time, your app should use the available time to set up its user interface as quickly as possible. Only tasks that contribute to setting up the user interface should be performed on the main thread. All other tasks should be executed asynchronously, with the results displayed to the user as soon as they are ready.
For more information about using GCD and operation objects to execute tasks, see Concurrency Programming Guide. 38.How To Install Cocoa Pods In Xcode? Before that make sure you instal cocoa pods in your system In order to do that type this command in terminal such that it instal cocoa pods ($ sudo gem install cocoapods) Here i am Talking about to install Respective Pods('GoogleMaps') Step1: Go to Terminal Step2: Make sure the project in vch u want to include cocoa pods , that project should be on desktop. Step3: cd desktop Step4: cd projectName (the name vch u r giving at the time of creating Project) step5: touch podfile (vch will create a empty pod file in your Project folder) step6: open pod file (which will open Podfile and you can copy paste your Own Podfile) For Example :
source 'https://github.com/CocoaPods/Specs.git'
platform :ios,'8.1'
pod 'GoogleMaps'
This is was i did in my previous project ,,,After copying this above code in pod file.You need to save it by pressing command+s. step7: pod install (this will install respective pods('GoogleMaps') in your Project Folder ) [ After writing 'pod Install' Updating local repositories message will appear in terminal vch means your pods installation starts ... ] step8: From Now onwards we need to work on xc.workspace.(we are no way related to xcodeproject). 39.How to convert Hexa color to UIColor in IOS? A.
self.view.backgroudColor=[self ColorWithHexString:[UIColor redColor]]; 40. How to install GoogleAds in your IOS Project?
A. Step1: Make sure you install GoogleMobileAdsSdk You can find the link here(https://developers.google.com/admob/ios/quick-start) Go to that above link and you will find Home,Guide,sample, support,Download.Click that download buttonthere you install zip file of googlemobileadssdkios.zip. After installing add that framework(googlemobileads.framework) to your Respective project. Thats it you install Adsframework. Step2: Next step include googleads framework in your project by import statement for example
@import GoogleMobileAds;
Step3:Include one property and one method in viewcontrooler.h
make sure you include delegate <GADBannerViewDelegate>